Set by step guide for a free and easy way to set up a low maintenance blog

Introduction
I always struggled with the following; when I find a solution for a certain problem and months down the line I run into a similar problem and try to remember how I solved the previous one. Cursing at myself: Why didn’t I write this down!? Like many other IT professionals I created a blog (years ago) to write those solutions down for myself and anyone who stumbles upon the blog. But unfortunately my blog at that time has followed the trend of the general population of IT related blogs. It withered away due to the lack of attention from yours truly.
However the need to somehow catalog IT related solutions and ideas has not died down. This is specially the case during moments when I needed it the most and could not find the link or the solution itself knowing I solved the issue at hand a couple of month ago. Although on multiple occasions I have entertained the idea of recreating a new blog but never put it into action simply due to the amount of effort required for maintaining a blog. After my first blogging experience the CMS like systems with extensions and add-ins and the tools for writing the content itself never appealed to me and kept me from giving it another go.
A couple of months ago I discovered static site generators. The idea of generating a static site from Markdown really appealed to me. Markdown is something I have used for years as part of documentation for the scripts and solutions I have developed. Markdown makes writing documentation approachable and inviting. In my case this approach appeals to me even more as I can use Visual Studio Code for writing blog content. Combined with a CICD pipeline which takes care of building and posting the content motivated me to give a blog another go. I am eager to share any solutions I find with the future me and anyone who finds the blog.
I cant think of a more fitting subject to start the blog with then a step by step guide describing how I created this blog.
Requirements
These are the tools I used to realize my current blog set-up. At the core I am using Hugo as my static content generator and GitHub Pages for hosting the static content. All other tools are supplemental to realize the core set-up and can be replaced by alternatives.
- VS Code
- Chocolatey
- Git
- Hugo
- Azure DevOps Organization - create one for free here
- GitHub Pages - create a GitHub account here
- Domain name (optional) -> You should
The set-up
Keep in mind that my goals for this set-up are:
- It must be low threshold from a usage perspective.
- The maintenance effort must be zero to none.
As already mentioned in the Requirements chapter I am using Hugo as the static content generator to meet my first goal. To meet my second goal I am running everything inside an Azure DevOps pipeline which publishes the generated blog to my GitHub account. The overall set-up looks like this:
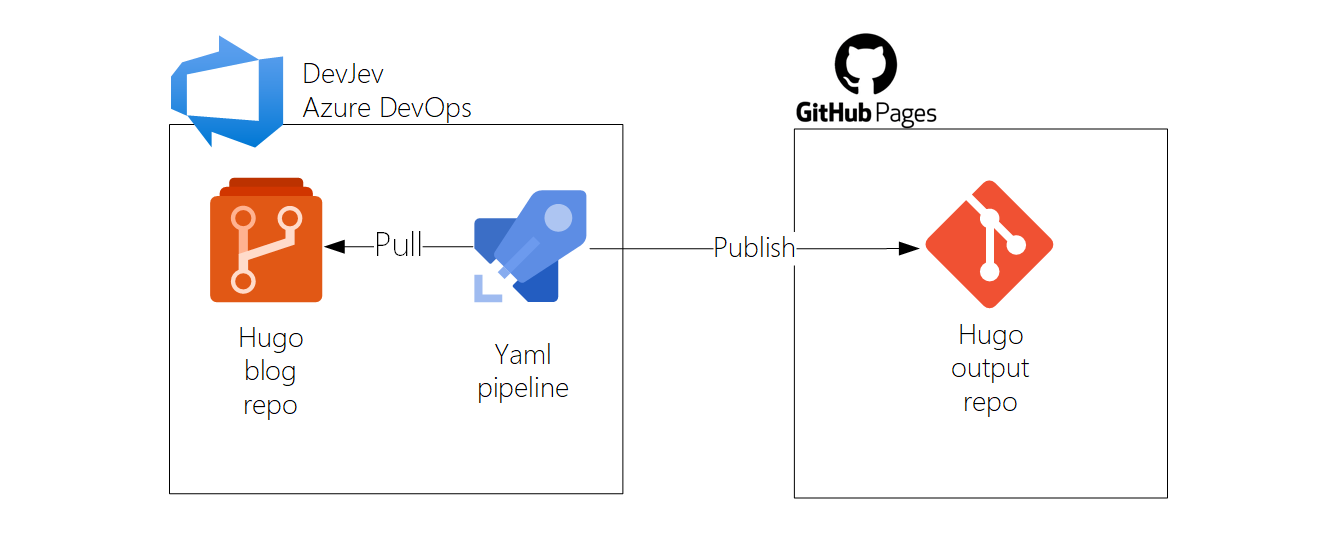
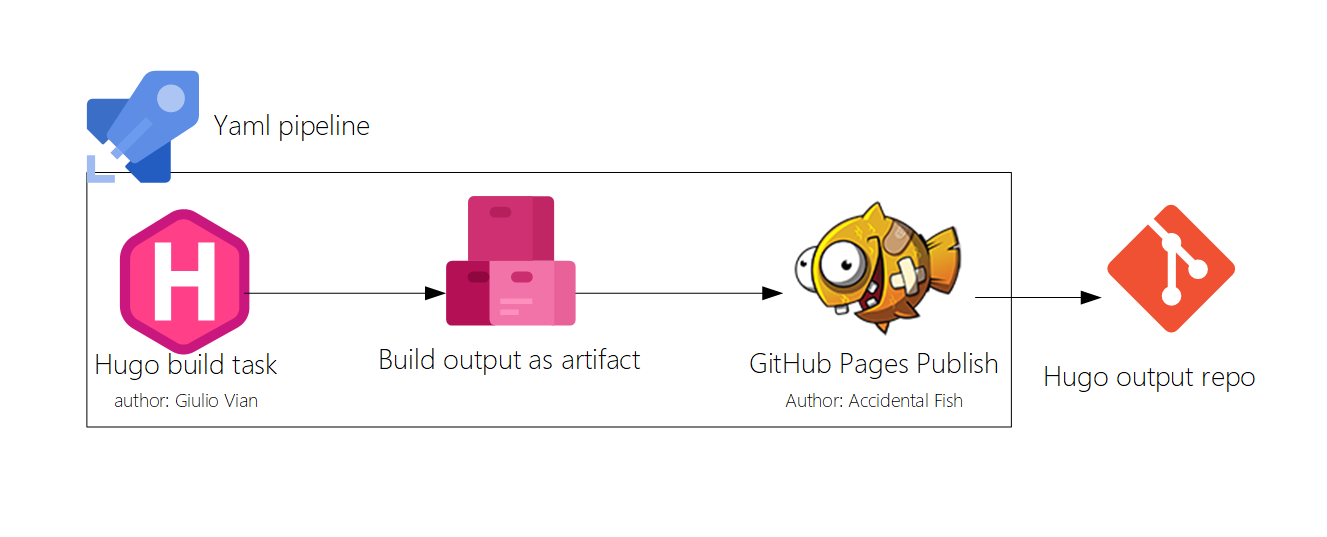
This set-up allows for a trigger based release of content. So each time I push changes into the master branch the pipeline kicks in and ensures that the change is pushed to the output GitHub repository. The pipeline to achieve this is as follows:
As mentioned in the title I will do my best to explain the set-up step by step. However if a manual already exists for a specific part of configuration I will simply reference it (via a link). To structure this guide I have created a separate chapter for each step. In addition I have also split the really big steps into subchapters. The result is as follows:
- Introduction
- Requirements
- The set-up
GitHub Pages repository
NOTE: You need to have a GitHub account before you can continue with this chapter. You can create one here .
Head over to GitHub and create a new repo . When creating the repo it’s really important to name it properly. The difference between a regular repo and a Pages repo is in the way the repo is named. So to create a Pages repo make sure to name is as follows: username.github.io. In my case, my GitHub account/username is devjevnl so my GitHub Pages repo is named devjevnl.github.io
Additional information (like the different type of GitHub Pages) and detailed instructions are available at the GitHub Pages site.
After creating the GitHub Pages repo leave it as it as is for now. It will be used in later chapters.
Azure DevOps - Hugo blog repository
This chapter covers the creation of the Azure DevOps project, setting up the CICD repository and the actual installation and configuration of the Hugo engine.
Azure DevOps project
NOTE: You need to have an Azure DevOps account before you can continue with this chapter. You can create one for free here .
- Open your Azure DevOps and click on +New Project.
- Give your project a name and a description.
- Ensure that visibility is set to private.
- Leave the Advanced setting to their default.
- Click +Create.
CICD repository
To keep the instructions as simple as possible I am going to use the default repo available in the newly created project.
NOTE: I use VS Code for this step but if you have an alternative editor you can of course use that one.
- Navigate to Repos of your project
- Clone the default repo (in my case by clicking the Clone is VS Code button)
- Create two folders, one named
pipelinesand one namedsrcin the just cloned repo
The next step is to install the Hugo engine.
Hugo Installation and Configuration
There are various methods for installing Hugo. All of these methods are documented on the installation page of Hugo . For this blog I used the chocolatey approach. First make sure to install chocolatey by following the installation steps available on chocolatey.org . Then follow the Chocolatey (Windows) steps on the Hugo installation page.
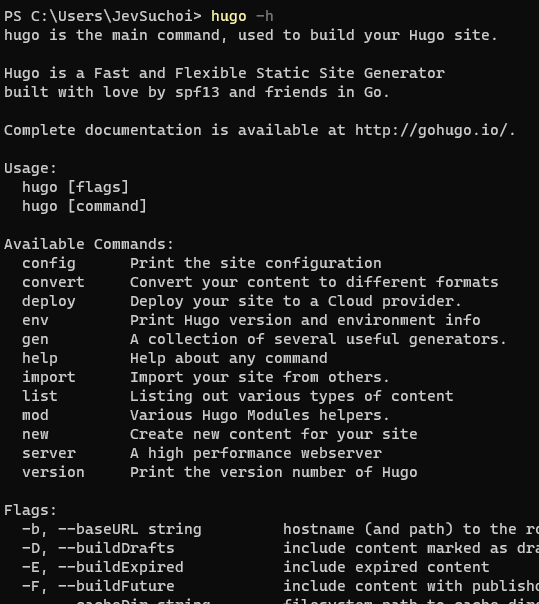
After installation make sure to type hugo -h in the console window to ensure the installation process has been successful. The result should be that Hugo help is showing, see following example.
With everything in place it should be possible to create a Hugo blog site. Open up VS Code again and make sure you have the Terminal visible. You should be in the root folder of your repo. Navigate one folder down by typing the following in the Terminal:
Type the command as show below. It will create a sub-folder under \src\ named devjev_blog with a generated Hugo site inside it. Make sure to replace devjev_blog with a title to your liking.
I don’t want to go into great detail about how to fully configure and utilize Hugo as this is done extensively within the installation manual of Hugo. However to showcase the potential of this solution. I want to quickly run trough some basic configuration and a “Hello World” blog post.
So lets continue the set-up by adding a theme and creating the blog-post placeholder. This is done by executing the following commands
Enable the theme editing the config.toml file and adding the following line as a ne line to the file.
NOTE: It should also be possible with command line command: echo ’theme = “ananke”’ » config.toml. But for me this results in a malformed .toml file. So I had to fix it manually.
Open the hello-world.md file and add some text to it. My example is as follows:
Test the Hugo config by the following command and opening the local URL Hugo generated for you. In my case: http://localhost:1313/.
Hugo basic config has been completed. Now lets move on to the more interesting parts. You can play around with styles and additional config later ;-)
Azure DevOps - Yaml pipeline
Now that Hugo is running locally and GitHub Pages repo has been configured its time to recreate the same set-up as part of the Azure DevOps pipeline.
Create a new yaml pipeline file in the pipelines folder of the CICD Git repo created as part of the CICD repository step. You can call it something like ‘hugo-blog.yml’. The details about yaml pipelines in Azure DevOps can be found here . In this chapter I will cover the specific pipeline features required for the Hugo engine to automatically build and publish the content.
Lets start by creating a trigger, since the default branching config has remained as it is the trigger should include the master branch. The trigger looks like this:
Next, the stages of the pipeline should be defined. In this case two stages, one for running Hugo engine which generates the static content and a second one to publish the content to the GitHub pages repo. Make sure to leave an empty line after the trigger and prior to adding the two stages as shown below.
Now let’s add a job to the GenerateBlogContent stage. Within the job an image to execute the job must be specified, in this case the windows-latest. The job looks like following:
Next let’s populate the job. Each job consist out of steps. In this case this job consist from three steps, namely;
- Checkout
- Run HugoTask@1
- Publish artifact
Checkout
This is a fairly straightforward step its purpose is to checkout source code. While nondeployment jobs automatically check out source code, the default behavior of these such jobs is not to checkout submodules. Sine the Hugo theme is a submodule this step is specified with the property submodules set to true. More information on this step can be found here
Run HugoTask@1
This step is a task of the type HugoTask@1, this is the task in which the Hugo engine runs and converts the Hugo solution and markdown files into static content. The task type used for this step can be installed into your Azure DevOps environment via the following link
. As input this task requires a source directory from which to get the Hugo solution including the markdown files. And a destination directory to which write the rendered static pages. In addition I have extendedVersion set to true as my Hugo theme is requires SCSS/SASS support. The source directory should point to the subfolder of /src/ created earlier when configuring Hugo. Basically pointing t your Hugo ‘root’ folder.
Publish Artifact
This step is a simple publish step used to publish the output from step two as an artifact. In the example below I called the artifact hugo-blog-content but you can call it anything you like. Just make sure when referencing the Artifact you use this exact name.
The populated job looks like following:
Next lets construct the Publish Hugo Content stage. As shown in the example below this stage is a bit different from the generate stage. It has variables defined and is configured to depend on the generate stage. Let’s break it down.
Because this is the stage where content gets published to GitHub Pages the credentials for GitHub must be stored somewhere, to do so safely I am using a variables group
. You can name it whatever you like, but again make sure to reference it by the name you give it. You can create such a variables group in the Library section of Pipelines. This is how mine looks:
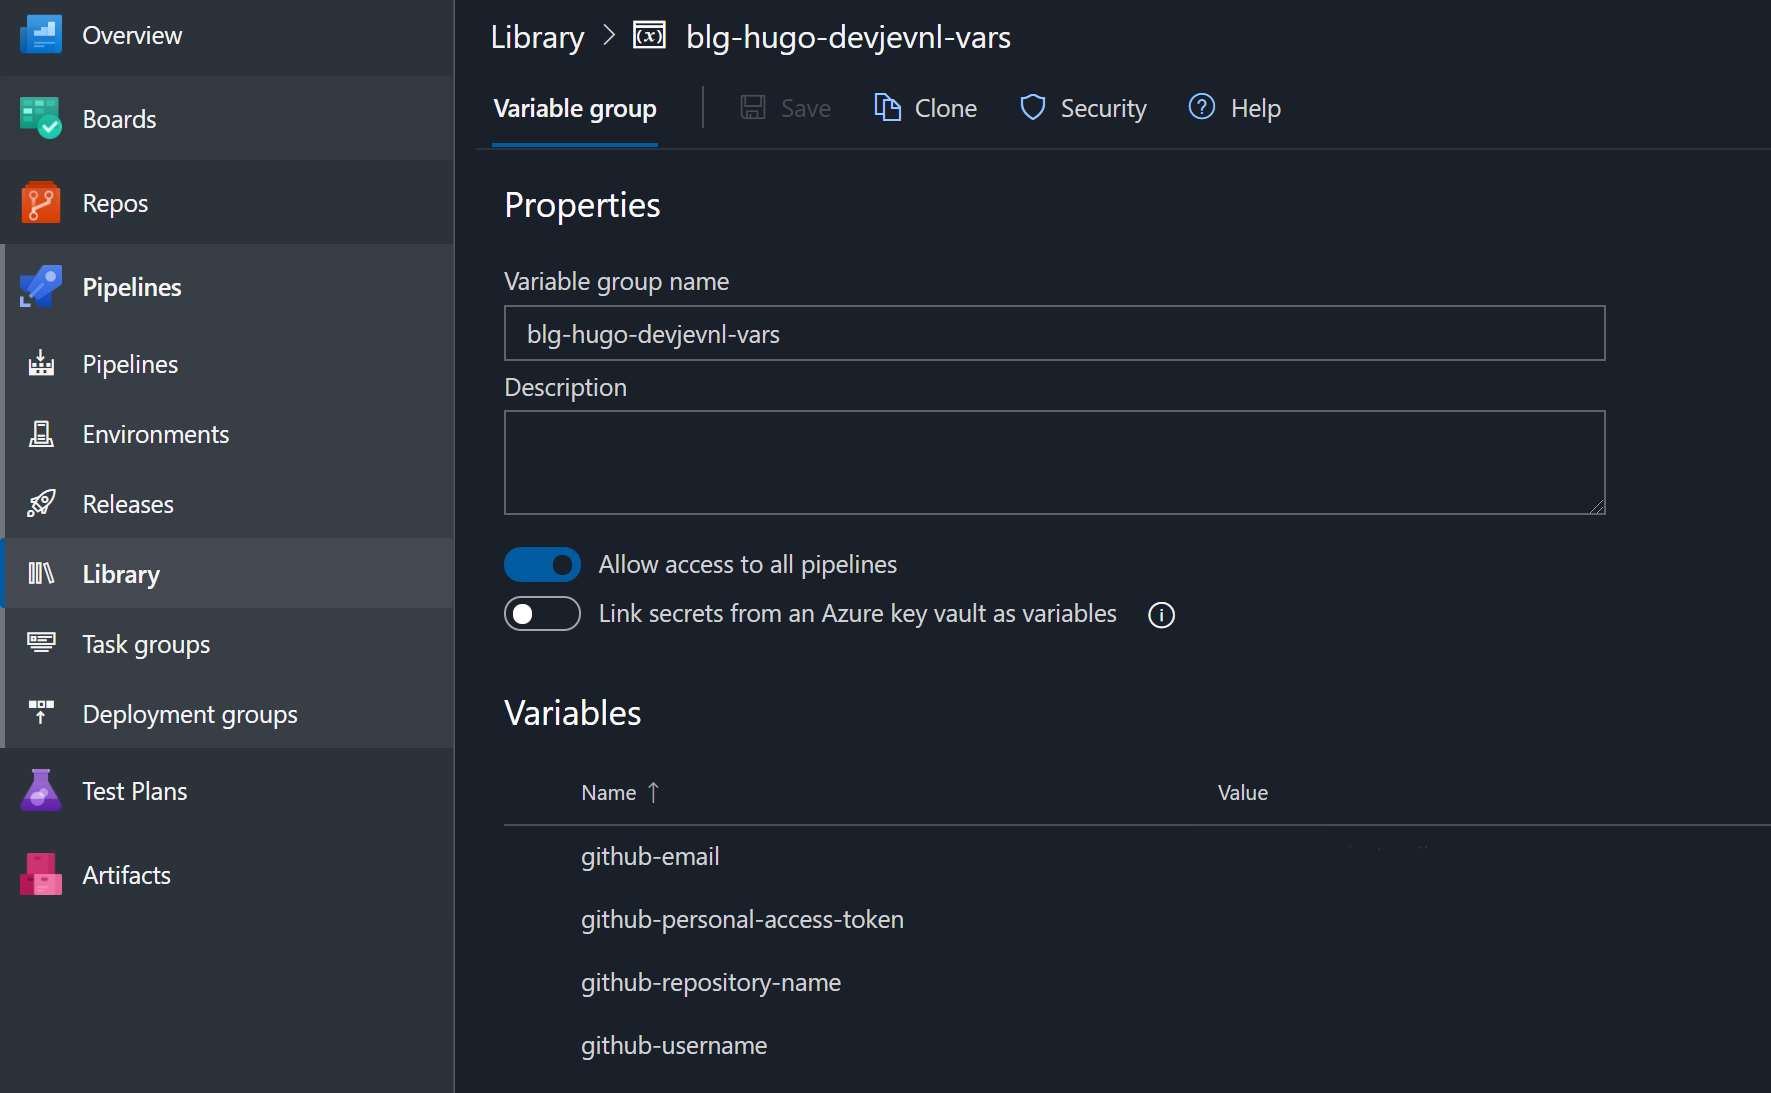
As visible in the above image the following input values are required:
- github-email - [The email address you want associated with the commit to the GitHub Pages branch]
- github-personal-access-token - [Your personal access token, steps on to how to generate one ]
- github-repository-name [The name of the GitHub repository that you want to publish pages to]
- github-username [your GitHub Username, e.g. DevJevNL (mine)]
Now that the variables group is created and populated with the required secrets lets continue deconstructing the pipeline code.
Next is the condition which ensures that the publishing only happens when the master branch build is successful. After the variables group is specified a display name for this stage is set by setting the diplayName property. Then a dependency is added which ensures that the previous stage has been executed successfully. There isn’t much sense in publishing if there is nothing to publish. The condition follows next. The current condition configuration is to ensure that the master branch has been **‘built’*- successfully.
After specifying the stage settings the jobs is specified, nothing special happens here its the same specification as already mentioned in the description of the previous stage. However compared to the job in previous stage this one has different steps, namely;
- Checkout
- Download
- Run GitHubPagesPublish@1
Checkout
As mentioned earlier non deployment jobs automatically check out source code. So this step is specified to ensure this does not happen because the content that will be published is generated by the previous step and is made available as an artifact.
Download
This task downloads the artifact from an earlier stage or from a different pipeline. In this case from the GenerateBlogContent. More information about this task can be found here
. Its important that the name of the artifact is an exact match with the one specified in the GenerateBlogContent stage.
Run GitHubPagesPublish@1
Next is the actual task that does the publishing. As already mentioned at the start of this post I am using the GitHub Pages Publish task from the publisher ‘Accidental Fish’. This is where the variables group I just created will be put to use. The variables are as follows:
- docPath: folder path of the artifact to publish
- githubusername: GitHub username as specified in the variables group, i.e. $(github-username)
- githubemail: The email address you want associated with the commit to the GitHub pages branch, i.e. $(github-email)
- githubaccesstoken: The personal access token, i.e. $(github-personal-access-token)
- repositoryname: The name of the GitHub Pages repository, i.e. $(github-repository-name)
- branchname: unless you have added branches, this should be “master”
- commitmessage: The message you want associated with the commit - this defaults to “Automated Release $(Release.ReleaseId)”
When everything is put together the complete pipeline should look like this:
That’s it, the pipeline code is done. Don’t forget to commit and push the additions. The next and final step for the pipeline creation process would be to implement the pipeline in Azure DevOps.
Add YAML file as pipeline in Azure DevOps
The pipeline code should be available in the Azure DevOps repo (assuming the Git commit and push commands have been executed). Navigate to you Azure DevOps organization.
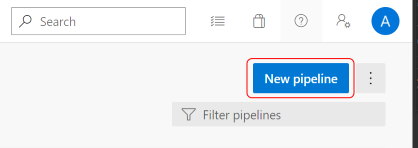
In the left hand menu click on Pipelines the select the Pipelines sub-option

Click on New Pipeline button located in the right top corner.
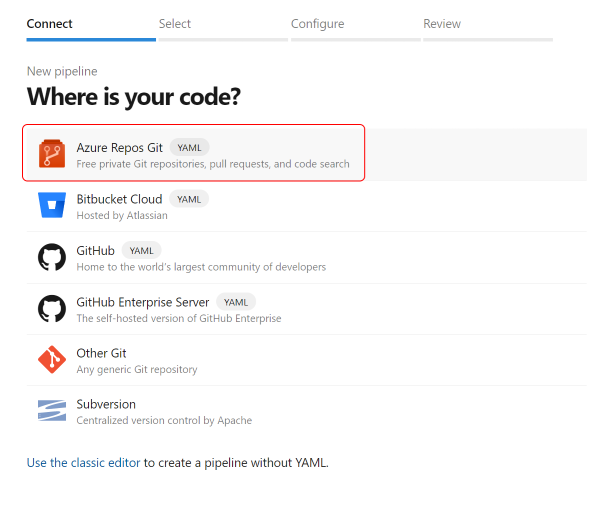
Select the Azure Repos Git option
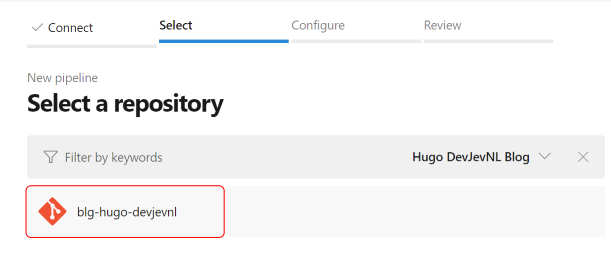
Click on the repository created in the earlier steps. If your Azure DevOps environment is empty there should only be one repo visible.
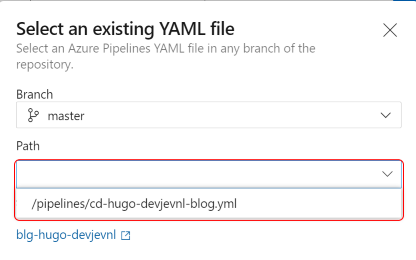
Select the Existing Azure Pipelines YAML file option

Leave the branch to the default value, this should be master. In the path dropdown box select the .yml file as created in the previous steps. And finally in the bottom right corner click on the create button to finalize creating the pipeline.
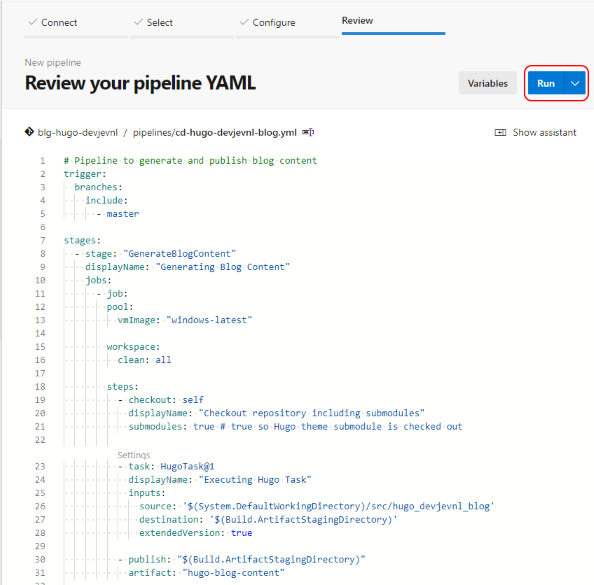
Review the YAML code and if everything looks good, click run to execute the pipeline.
The blog is now ready for content! Each time you push changes to the master branch by adding blog posts, the pipeline is triggered to generate static content and push it to GitHub Pages which hosts the content. So if you would navigate to your-gihub-account.github.io you should see the Hugo blog. While technically optional I consider having a personal domain name a must. The great thing about GitHub Pages is that this is supported without any cost (with the exception of buying the domain name of course).
Domain name configuration (optional)
So as putting the icing on the cake lets walk trough the steps of configuring a domain name for the GitHub Pages repo created earlier. Navigate to GitHub and login with your account then select the your-gihub-account.github.io repository an click the Settings option. In my case I opened the devjevnl.github.io repo and selected then option. Then scrolled down to the GitHub Pages section. This is where the custom domain configuration is done, the steps are quite simple and described in a separate GitHub Learn more guide . So I am not going to cover it here as the GitHub guide is always up do date and in my opinion quite clear.
When the domain name configuration is done correctly it should look something like the this:
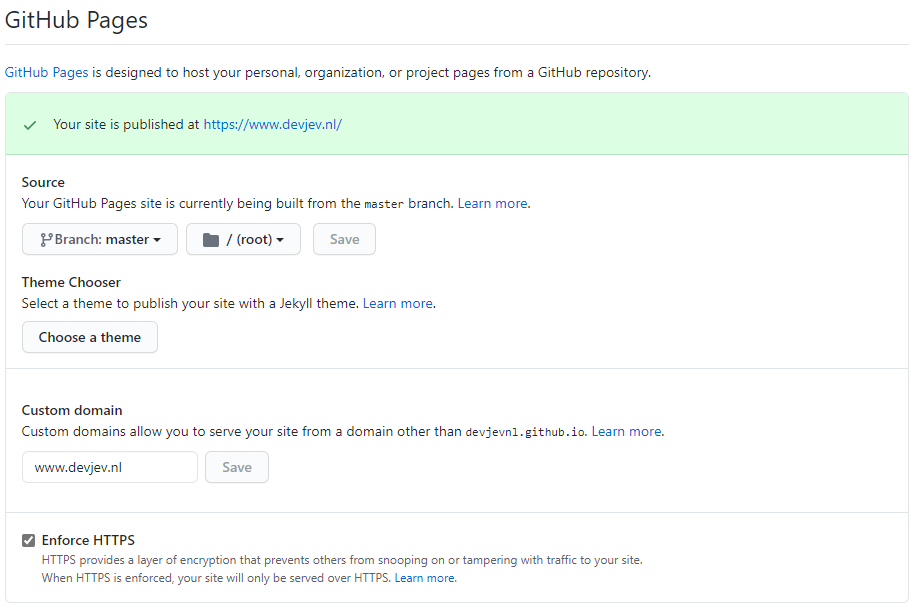
As I finial remark on this subject I would really recommend enabling the enforce HTTPS option.
So by now you should have an up and running blog which is fully free (with the exception of your domain name if you chose to implement one) and is ran for you by automation. Happy blogging!