🛠️ How to Build and Use Your Own Container with Azure DevOps Container Jobs 🚀📦

In my previous post 🚀 Azure DevOps Container Jobs: When Microsoft and Self-Hosted Agents meet, It’s the Best of Both Worlds! 🌐🛠️ you where able experience Azure DevOps container jobs. In this post I am delivering on my promise and explain set-by-step how to build and use your own container with Azure DevOps Container Jobs. Buckle up, and let’s get started!
Target set-up
Lets start by having a look at the target set-up.
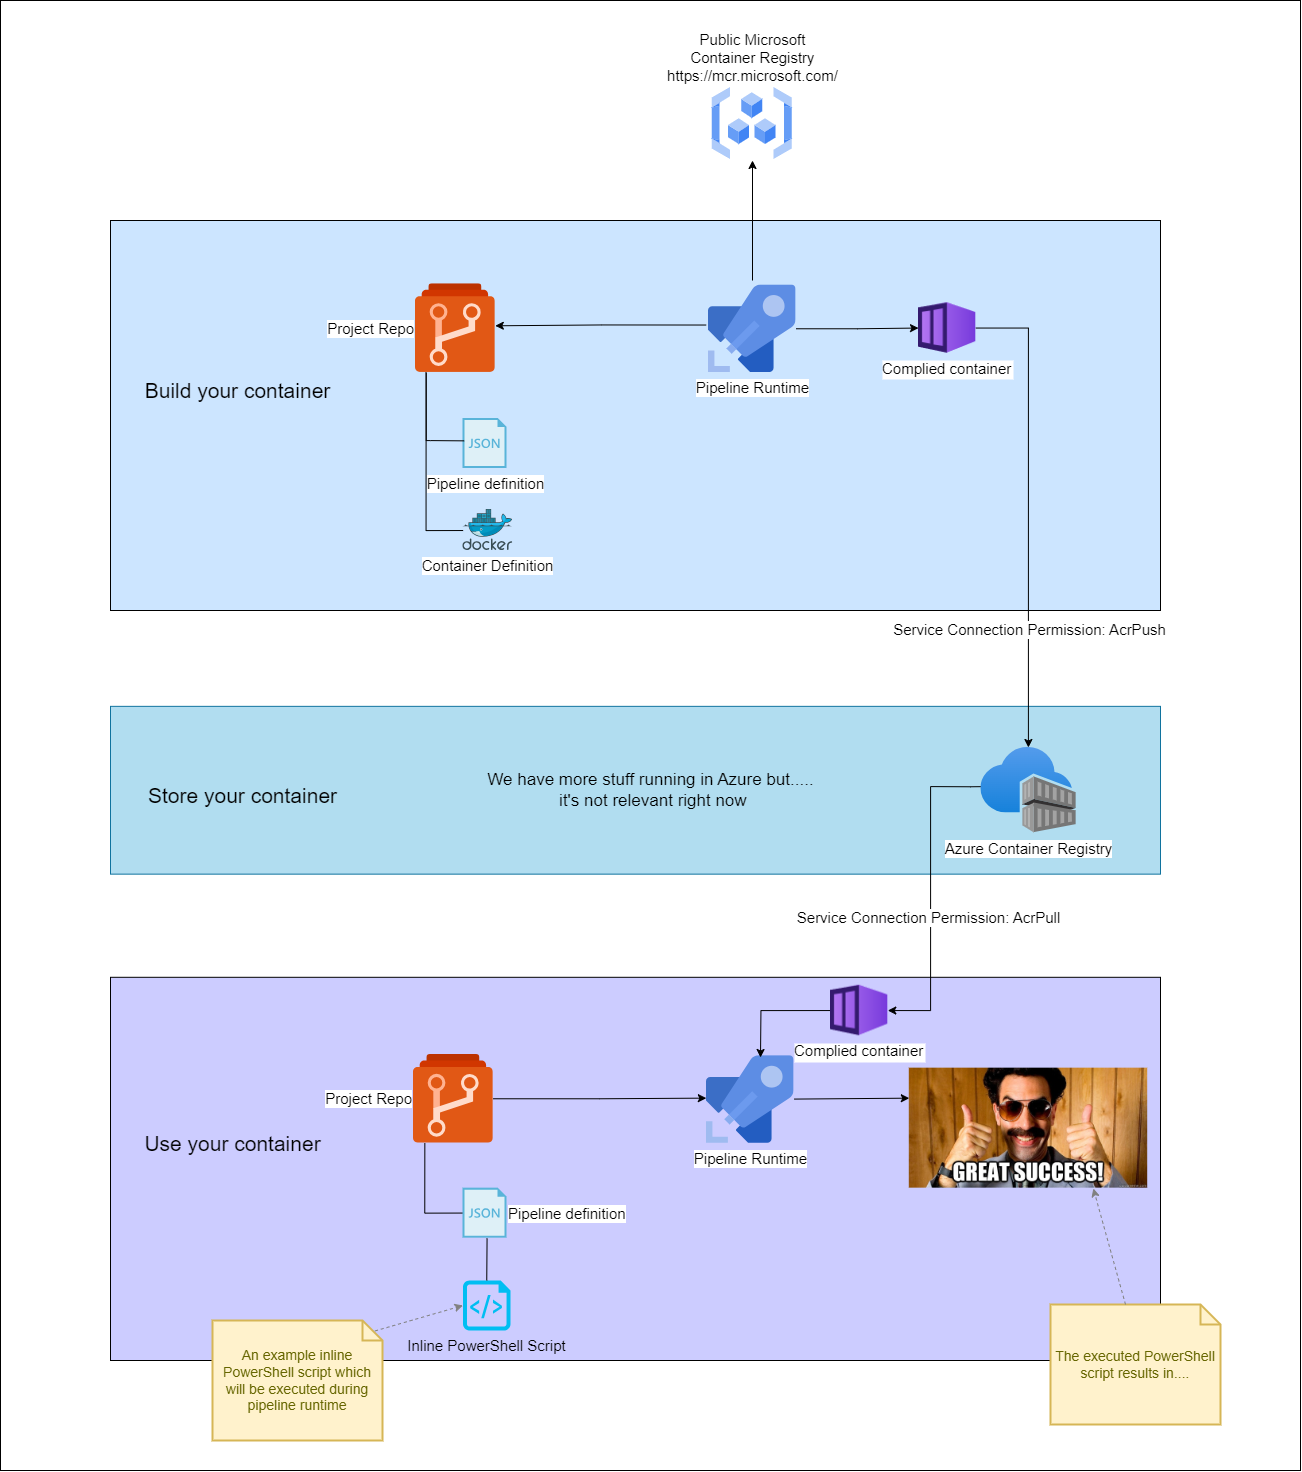
The goal of this set-up is to fist build your own container then store the container in a container registry and finally use the container in an Azure DevOps pipeline as a container job. Naturally some infrastructure needs to be in place to make this happen, but thats nothing to worry about as everything needed for to achieve the target set-up is included in this post.
With a clear understanding of what we want to achieve lets start building it.
The next chapters assume that you have met the following prerequisites:
- An Azure DevOps Organization with a Microsoft hosted agent is available and accessible to you
- A project in the concerning Azure DevOps organization exists
- Contributor and Endpoint Administrator roles granted to your identity in this project
- A n initialized Git repo in the concerning project is present
- You have access to an Azure Subscription with contributor permissions
- Your engineering/development environment has been set up as follow
- Your environment has the latest PowerShell version installed
- Your environment has the latest Az module installed
- Your environment has the latest Bicep version installed
Setting up the required infrastructure
Our first task is to create a place to store the container after it has been built. For this we are going to use an Azure Container registry .
-
Open a PowerShell terminal and connect to your Azure subscription by running the following snippet. Make sure fill your subscription id and tenant id .
-
Next lets create a resource group by running the following snippet. Feel free to change the resource group name to something of your choice.
-
Now save the following snippet as a file named
basicContainerRegistry.bicepto your local machine. -
The prerequisites to create an Azure Container Registry are met. Run the following snippet in the PowerShell terminal opened in step 1 to start the deployment.
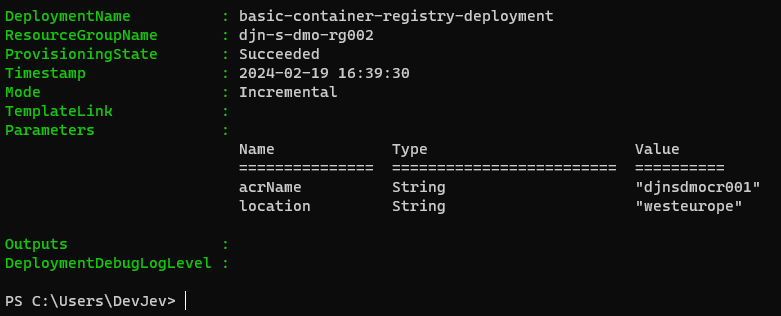
Assuming the deployment was successful you should see something like this in the terminal. It’s also possible to verify the result using the Azure portal.

Successful Bicep deployment -
We are ready to create a service connection in Azure DevOps to the container registry. This service connection will be used to push the container to the just created container registry.
PrerequisitesMake sure you have the necessary permissions to create a service connection in Azure DevOps. Meaning your identity has at least contributor role for the concerning project. Also make sure the same identity has direct or inherited Owner permissions on the newly created Azure Container Registry.- Open the Azure DevOps portal and navigate to the project you want to use the container registry in.
- In the project navigate to
Project settingsand thenService connections. - Click
New service connectionin the top right corner and selectDocker Registryas the connection type, click next. - For
Registry typeselectAzure Container Registryand forAuthentication TypeselectService Principal, a list of subscriptions should be loaded within a couple of seconds. - Select the subscription where the newly created container registry is located and select the correct container registry from the list of available container registries.
- Give the service connection a name, in this guide the name of the Azure container Registry is used but you can use any name you like.
- Write a proper description and click
Save. The service connection is now available for use in the project.
All the prerequisites are now in place to start building the container.
Building and storing the container
Our next task is create a container definition, a pipeline to build the container and finally push the finished result to the container registry we just created in the previous chapter.
- Assuming you still have your Azure DevOps Project open in your browser, select your repo, create a new file called
myContainer.DockerFileand paste the following snippet into the file.
-
Next Commit the file using the button in the top right corner. Preferably you should use an IDE like Visual Studio Code and Git to Commit your changes. However to ensure everyone can follow along these steps guide you using the Azure DevOps portal.
-
In the same repo create a new file called
buildMyContainer.ymland paste the following snippet into the file. -
Make sure that the
containerRegistry:value is set to the name of the service connection we created in the previous chapter. In case you forgot, the name of the service connection can be found in the Azure DevOps portal underProject settingsand thenService connections. -
Optionally you can change the
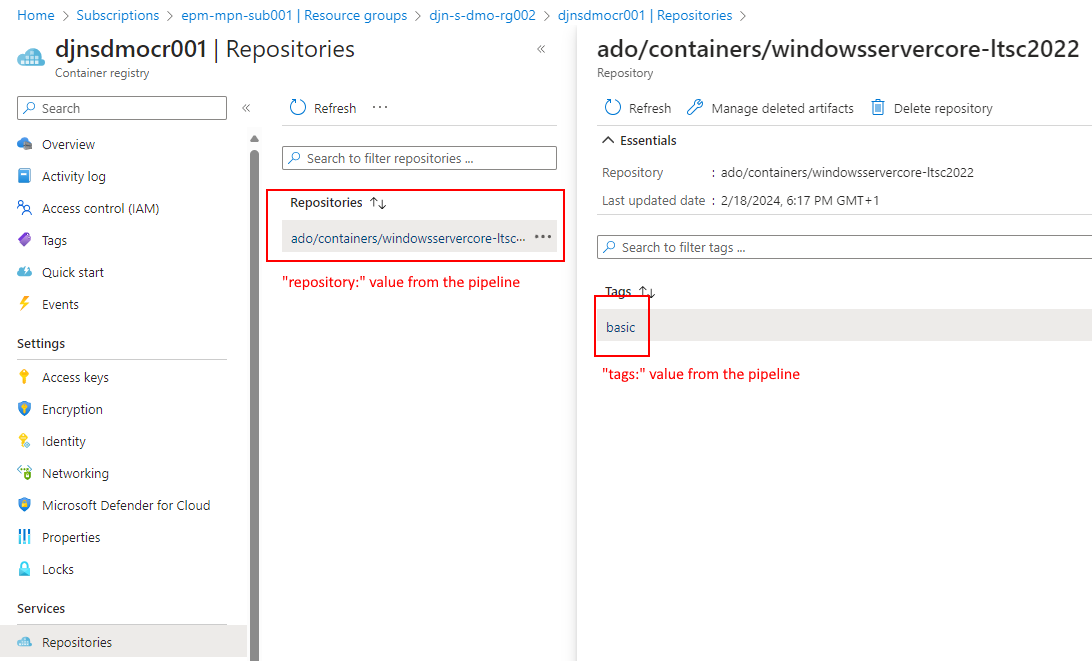
repository:value to a name or path of your choice. The repository is used to identify the container in the container registry, you will see this in the example at end of these steps. -
Next make sure the
Dockerfile:value is set to file path of the Docker file we just created in step 1, themyContainer.DockerFile. -
Optionally you can change the
tags:value to a tag of your choice. The tag is used to identify the container in the container registry. The default value islatestbut you can change it to anything you like. Just make sure to use the same tag when using the container in an Azure DevOps pipeline. -
Commit the file using the button in the top right corner.
-
Create a new pipeline by clicking the
Pipelinesmenu option in the Azure DevOps portal and thenNew pipeline. Select the repository where you created thebuildMyContainer.ymlfile and click Continue. Then selectExisting Azure Pipelines YAML fileand select thebuildMyContainer.ymlfile from the list, click Continue. -
Finally click
Runto start the pipeline. This pipeline will build the container and push it to the container registry. -
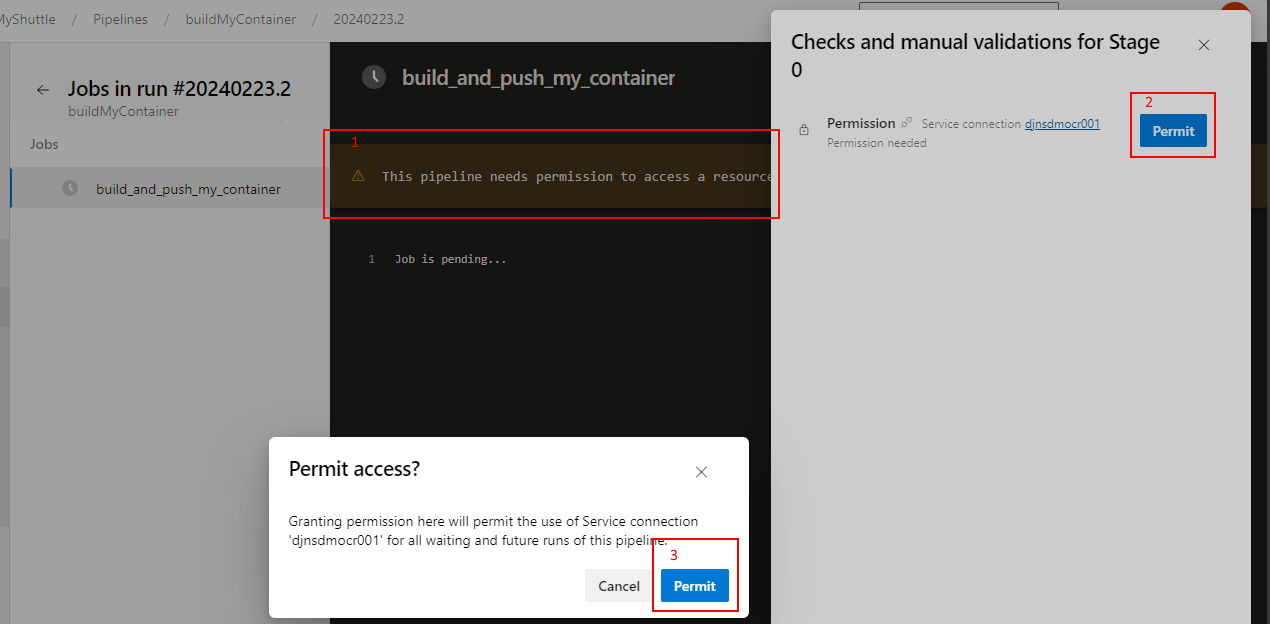
Since it’s a new pipeline, permissions to use the service connection need to be granted, you need
Endpoint Administratorsrole for this. Click theReview and runbutton and then click theCreatebutton to grant the necessary permissions. The pipeline will start running after the permissions have been granted.
- Expect the build to take at least 30 minutes to complete ☕. When the pipeline has completed you should be able to view the container in the container registry via the Azure portal. See following screenshots.

Assuming everything has gone according to plan the container is ready for use!
Using the container in an Azure DevOps pipeline
Lets put all the hard work done during previous two chapters to good use and use the container in an Azure DevOps pipeline. The following steps will guide you through this process.
-
Navigate back to the repo we just used in the previous chapter and create a new file called
myCustomContainerJob.ymland paste the following snippet into the file. -
Modify the
image:value as:[Azure Container Registry Name].azurecr.io/[Repository value from buildMyContainer.yml]:[Tag value from buildMyContainer.yml]to match the container we just build and pushed to the container registry. If you left the values as specified in the snippets it should state:djnsdmocr001.azurecr.io/ado/containers/windowsservercore-ltsc2022:basic. -
Modify the
endpoint:value to match the name of the service connection we created in theSetting up the required infrastructurechapter. In case you forgot, the name of the service connection can be found in the Azure DevOps portal underProject settingsand thenService connections. -
Next Commit the file using the button in the top right corner.
-
Create a new pipeline by clicking the
Pipelinesmenu option in the Azure DevOps portal and thenNew pipeline. Select the repository where you created themyCustomContainerJob.ymlfile and click Continue. Then selectExisting Azure Pipelines YAML fileand select themyCustomContainerJob.ymlfile from the list, click Continue. -
Finally click
Runto start the pipeline. The pipeline will use the container to run the pipeline steps. -
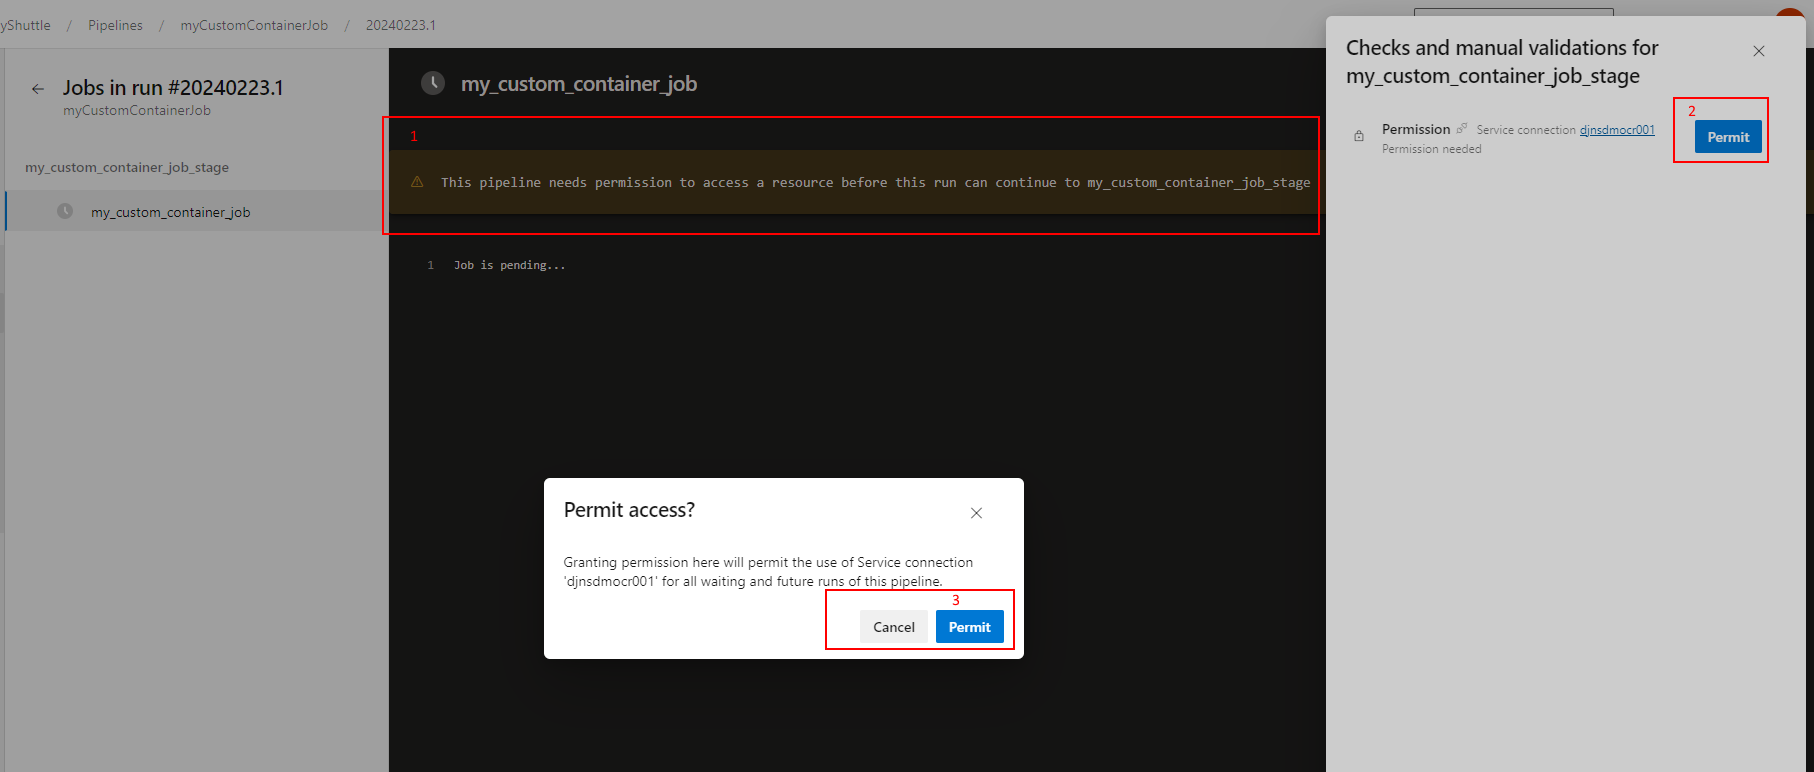
Again, since it’s a new pipeline permissions to use the service connection need to be granted, you need
Endpoint Administratorsrole for this. Click theReview and runbutton and then click theCreatebutton to grant the necessary permissions. The pipeline will start running after the permissions have been granted.
- Review the PowerShell steps in the pipeline, you should notice that the container is used to run the steps. Also notice the Terraform is out of date! message, this message is shown because the contain definition file has version 1.7.3 defined.
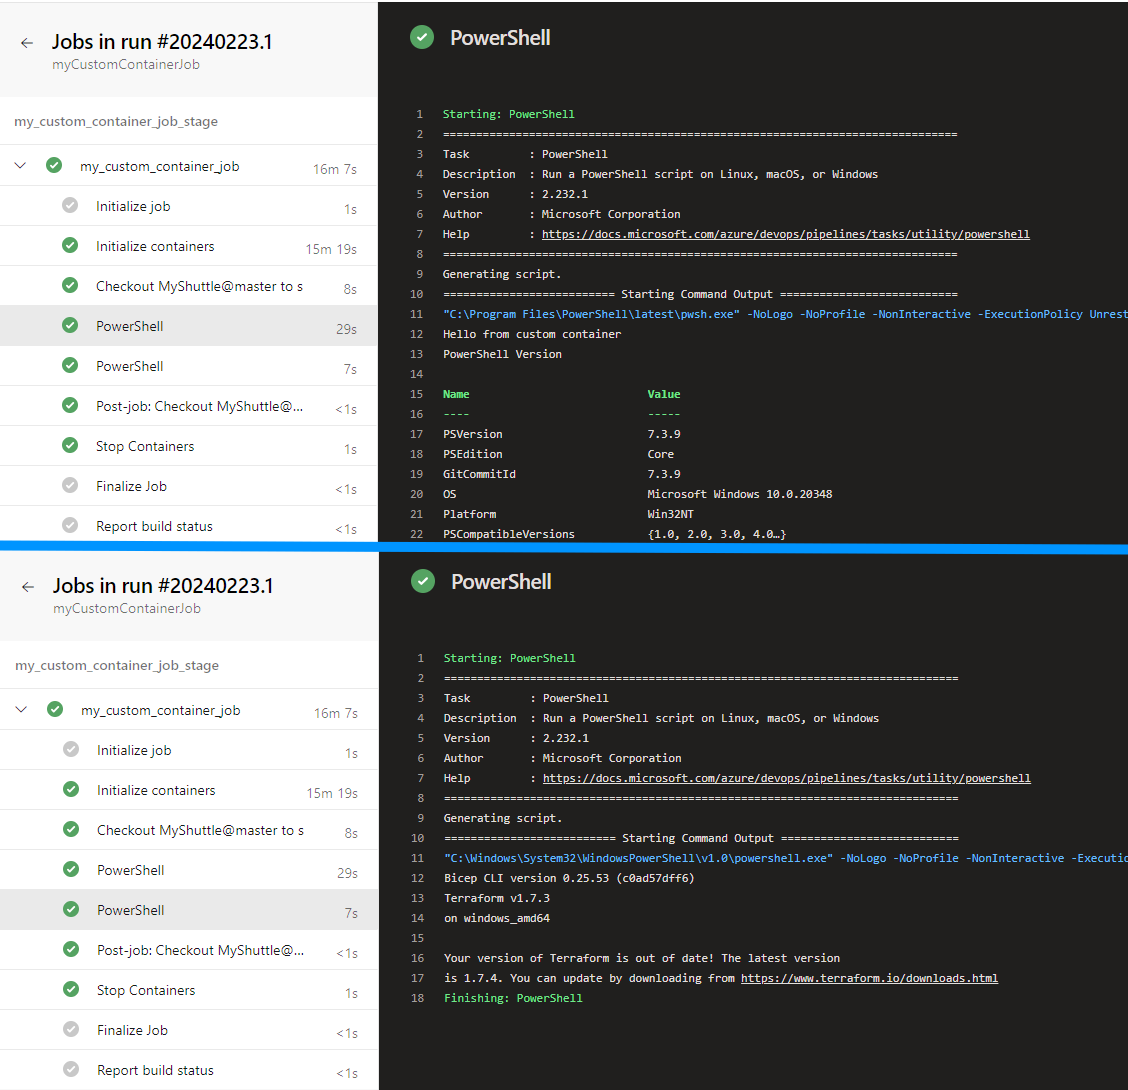
Congratulations, you have just successfully used your own container in an Azure DevOps pipeline.
Wrapping up
And there you have it, 🛠️ How to Build and Use Your Own Container with Azure DevOps Container Jobs 🚀📦. There are plenty of other configuration options available for creating and using your own containers, so make sure to check out the reference material used to make this post.
- Microsoft-hosted agents
- Self-hosted Windows agents
- Define container jobs (YAML)
- Microsoft Container Registry
- Azure Container Registry roles and permissions
- Simple Azure Container Registry Template
- PowerShell-Docker
- Visual Studio Code
- Git
- Chocolatey
- Get subscription and tenant IDs in the Azure portal
As always, a big thanks for reading this post. If you liked it, don’t be shy and have a look at my other posts .